
Premium EPS Covings Installation
Stylish plaster-coated covings that enhance any interior with ease and elegance.
Read more
XPS Regular Coving Installation
Quick and easy to install using a mitre box and saw. Ideal for DIYers, decorators and proffesionals.
Read more
Exterior Moulding Installation
Durable and weather-resistant mouldings made for façades, porches and outdoor trim features.
Read more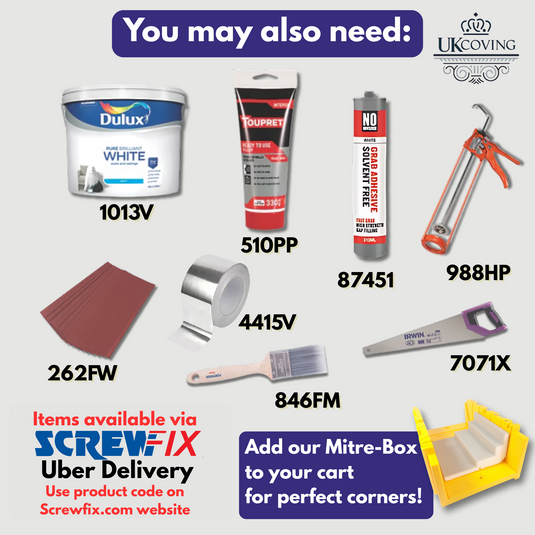
Recommended Accessories
Everything you need to install and finish your covings and mouldings — trusted, UK-sourced tools with Uber Delivery
Read morePremium EPS Covings Installation
🛠️ Tools and Materials Needed
- EPS plaster-coated coving
- Solvent-free adhesive
- Mitre saw
- Acrylic caulk or filler
- High-grit sandpaper (120+)
- Water-based paint (2–3 coats recommended)
- Measuring tape and pencil

🧱 Step-by-Step Installation Guide
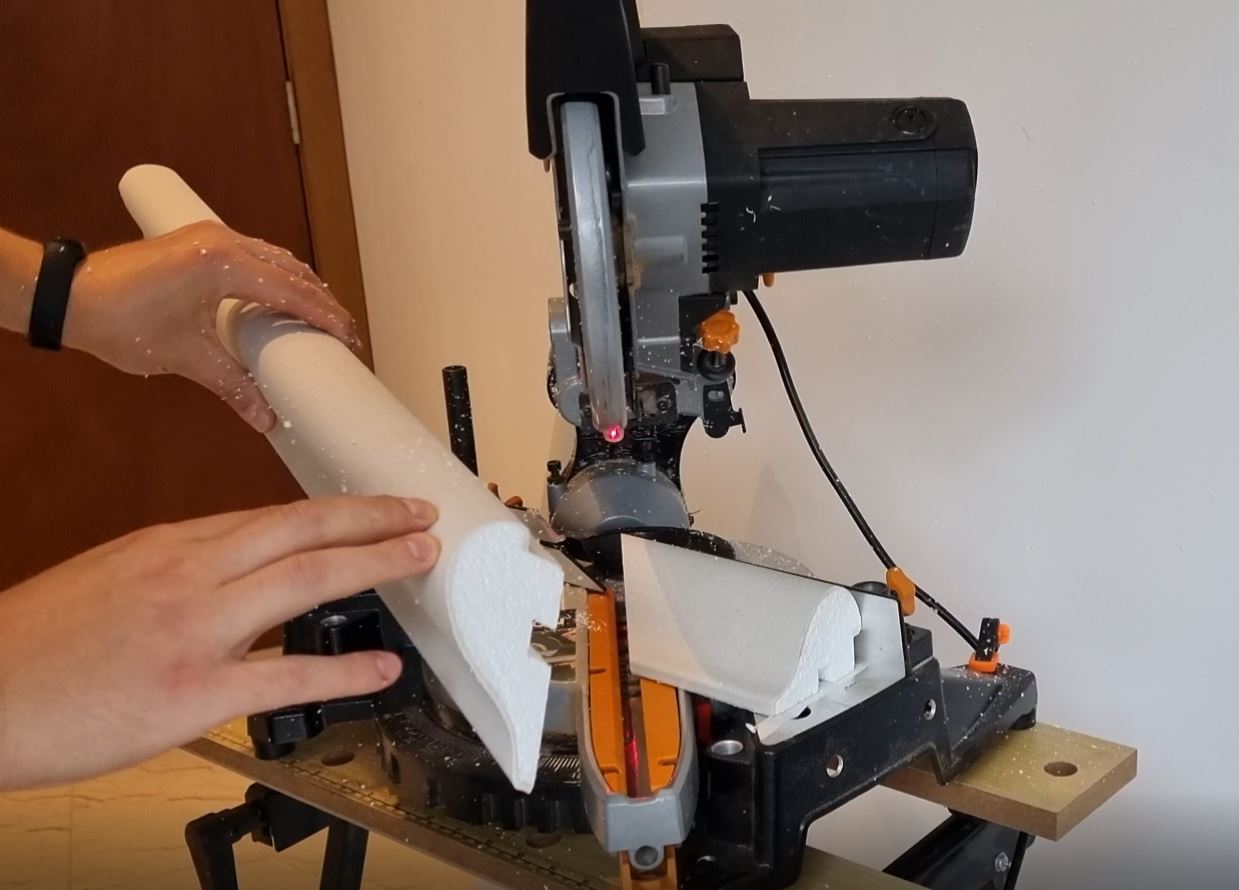
- Measure and Cut: Measure your wall lengths and cut coving to size. Use a mitre saw for precise cuts.
- Apply Adhesive: Spread a generous layer of solvent-free adhesive across the back of the coving for full coverage.
- Fix in Place: Press the coving into the wall-ceiling joint and hold briefly to secure the bond.
- Seal Joints: Fill any visible joints or gaps using acrylic caulk or filler. Smooth with a damp cloth or finger.
- Sand Smooth: Once dry, gently sand the filler and surface for a flawless finish.
- Paint: Apply 2–3 coats of water-based paint for a crisp, long-lasting result.
💡 LED Lighting Installation Tips
- LEDs can go directly onto the coving. There is no need for extra layer of alluminum tape, nor paint.
- Holes for GU10 bulbs are NOT pre-cut. They need to be cut on site.
🧼 Maintenance Tips
- Cleaning: Wipe coving with a damp cloth to remove dust. Avoid harsh chemicals.
- Repairs: Minor chips or cracks can be filled, sanded and repainted easily.
XPS Regular Coving Installation
🛠️ Tools and Materials Needed
- XPS polystyrene coving
- Solvent-free adhesive
- Mitre box and saw or snap-off knife
- Acrylic caulk or filler
- High-grit sandpaper (120+)
- Water-based emulsion paint
- Measuring tape and pencil
🧱 Step-by-Step Installation Guide
1. Measure and Cut
Measure each wall and cut the coving to size using a mitre box and saw or snap-off knife. For corners, use precise angles or opt for pre-cut corner sections for ease.

2. Apply Adhesive
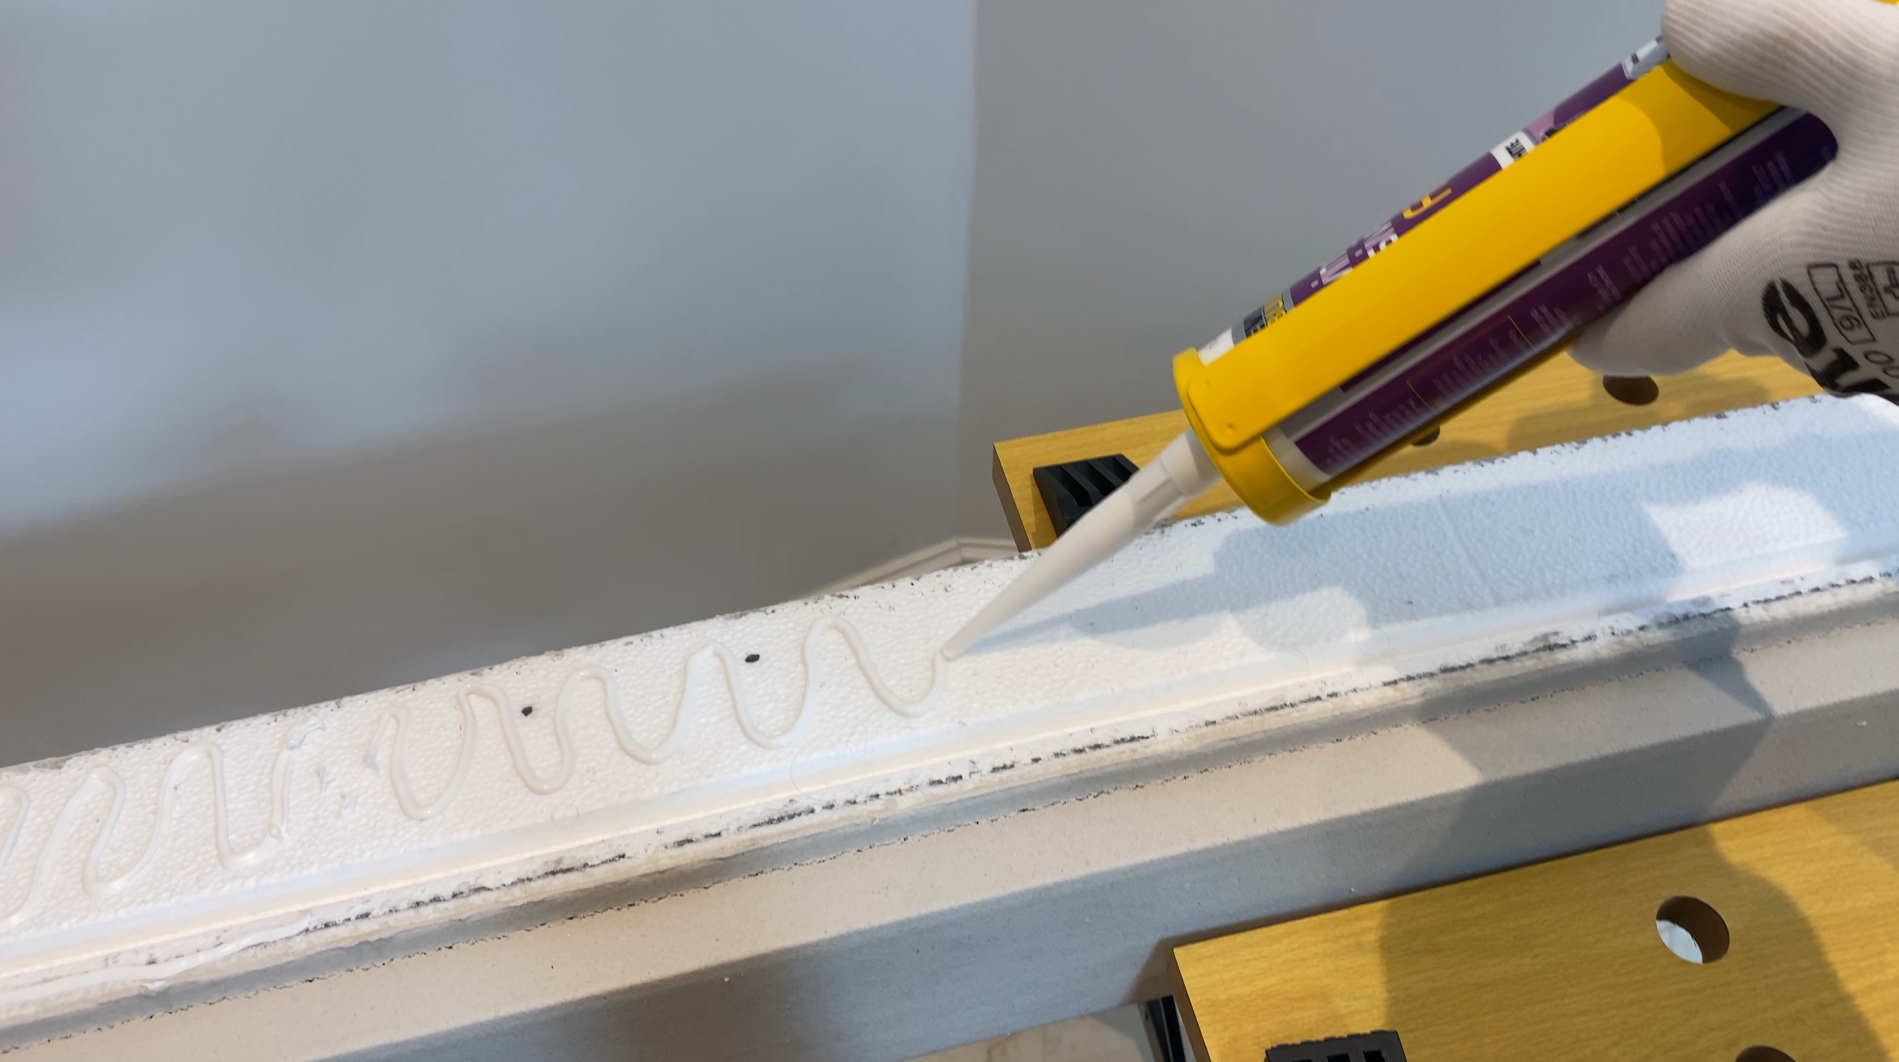
Spread a generous, even layer of solvent-free adhesive along the back of the coving. Ensure the adhesive covers all edges that will touch the wall and ceiling.
3. Position the Coving
Firmly press the coving into place at the ceiling-wall joint. Hold it for a short while to ensure the adhesive bonds correctly.
4. Fill Joints and Gaps
Smooth over any visible joins or small gaps using acrylic caulk or filler. A damp sponge or cloth can help you achieve a seamless finish.
5. Sand Smooth
Once dry, lightly sand the filled areas using high-grit sandpaper to prepare the surface for painting.
6. Paint the Coving
Remove dust and apply 2–3 coats of water-based emulsion paint. Priming is not necessary, though optional depending on the finish you prefer.
💡 LED Lighting Installation Tips
If you're incorporating LED lighting with your coving:
- Maintain a Gap: Leave at least a 3cm gap between the coving and the wall or ceiling. For stronger light diffusion or wider LED strips, 5cm or more may be ideal.
-
Light Blocking Options: ✅ Most Recommended
- Option 1 – Apply Aluminium Tape: Line the back side of the coving (where LEDs will shine) with aluminium or blackout tape. This is the most effective and mess-free method to prevent light bleed through the coving.
- Option 2 – Paint the Inside Dark: Before mounting, coat the inner rear surface of the coving with a dark paint (e.g. grey or black). Then apply your final colour. It's best to test this on an offcut to ensure there's no visible impact on the finished look.
- Option 3 – Multiple Coats of Paint: Simply paint the coving with several coats until the surface becomes opaque. This is a good fallback but may require more time and paint.
- Final Finish: Regardless of the light blocking method, a couple of coats of quality water-based paint will ensure a clean, consistent appearance.

🧼 Maintenance Tips
- Cleaning: Dust occasionally with a soft, damp cloth. Avoid abrasive cleaners or solvents.
- Touch-ups: Small chips or marks can be filled, lightly sanded, and touched up with paint to restore a flawless look.
Exterior Moulding Installation
🛠️ Tools and Materials Needed
- Exterior mouldings
- Measuring tape and pencil
- Saw with mitre box or electric mitre saw
- Construction adhesive (see below)
- Caulk/sealant (exterior grade)
- Screws and plugs (if additional fixing required)
- Spirit level
- Drill (if using screws)
- Exterior paint (water-based acrylic)

🏠 Step-by-Step Installation Guide
1. Prepare the Surface
Ensure the wall surface is clean, dry, and free from dust or loose material. Remove any obstacles or old mouldings. The surface should be flat and solid.
2. Measure and Cut
Measure the installation area carefully. Cut mouldings to required lengths using a saw and mitre box for angled corners. For straight cuts, mark clearly and cut with a saw.

3. Trial Fit
Position the mouldings temporarily to check fit. Mark their position on the wall. Use a spirit level to ensure they're perfectly horizontal or vertical as required.
4. Apply Adhesive
Apply construction adhesive to the back of the moulding in a zigzag pattern, ensuring good coverage particularly at the edges.

5. Fix to Wall
Press the moulding firmly against the wall in the marked position. Hold in place for several minutes to allow initial bonding. For heavier mouldings or when fixing to challenging surfaces, supplement with screws (pre-drill the moulding and wall, insert wall plugs, then fix with screws).

6. Seal Joints and Edges
Apply exterior-grade caulk/sealant along all edges of the moulding where it meets the wall and between adjoining pieces. This creates a watertight seal to prevent moisture infiltration.
7. Paint
Once adhesive and sealant are fully cured (check manufacturer recommendations, typically 24-48 hours), apply exterior-grade acrylic paint. Two coats are usually recommended for optimal protection and appearance.
☀️ Weather Protection Tips
- Choose Quality Paint: Use high-quality exterior acrylic paint that offers UV protection and weather resistance.
- Regular Maintenance: Inspect mouldings annually for cracks or damage. Promptly repair and repaint as needed.
- Water Runoff: Ensure design allows for water runoff rather than collection on horizontal surfaces.
- Additional Protection: Consider applying a clear weather sealant over painted mouldings for extra protection in harsh climates.
❗ Important Notes
- Our exterior mouldings are designed for decorative purposes and should not be used for structural applications.
- Always follow local building codes and regulations for exterior modifications.
- Installation is best performed in dry conditions with temperatures between 10-25°C.
- Allow sufficient curing time for adhesives and paints before exposure to rain or extreme weather.
🧰 Recommended Accessories
Everything you need to install and finish your covings, mouldings or decorative trims. These are tested products available from trusted UK suppliers. Click the links below to order quickly with Screwfix delivery.
🎨 Painting Tools & Finishes
-
1013V – Dulux Brilliant White Emulsion (10L)
Perfect for painting mouldings and ceilings. -
846FM – Fortress Flat Paint Brush 2"
For painting, detailing, or applying filler. -
262FW – Bosch 180 Grit Sandpaper (10 pack)
Smooths joints before painting.
🔧 Installation Tools
-
7071X – Irwin Fine-Finish Saw (500mm)
For cutting coving or moulding accurately. -
988HP – No Nonsense Sealant Gun
Use with any standard adhesive cartridges. -
4415V – Diall Aluminium Foil Tape
Ideal for XPS uplighter covings (light reflection & thermal barrier). -
UKCoving Mitre Box
For perfect 45° corner cuts — recommended for all installations.
🧱 Adhesives & Fillers
-
22070 – Evo-Stik "Sticks Like Sh*t" Adhesive
For strong hold on large or exterior mouldings. -
510PP – Toupret Ready-To-Use Filler (330g)
Fill gaps and joints before painting. -
Optional: No Nonsense Grab Adhesive
Lighter adhesive for XPS covings only.
📦 How to Order
All items listed above can be ordered online via Screwfix.com. Just click the links or use the product codes to find them on their site.
For the mitre box, order directly from us: UKCoving Mitre Box